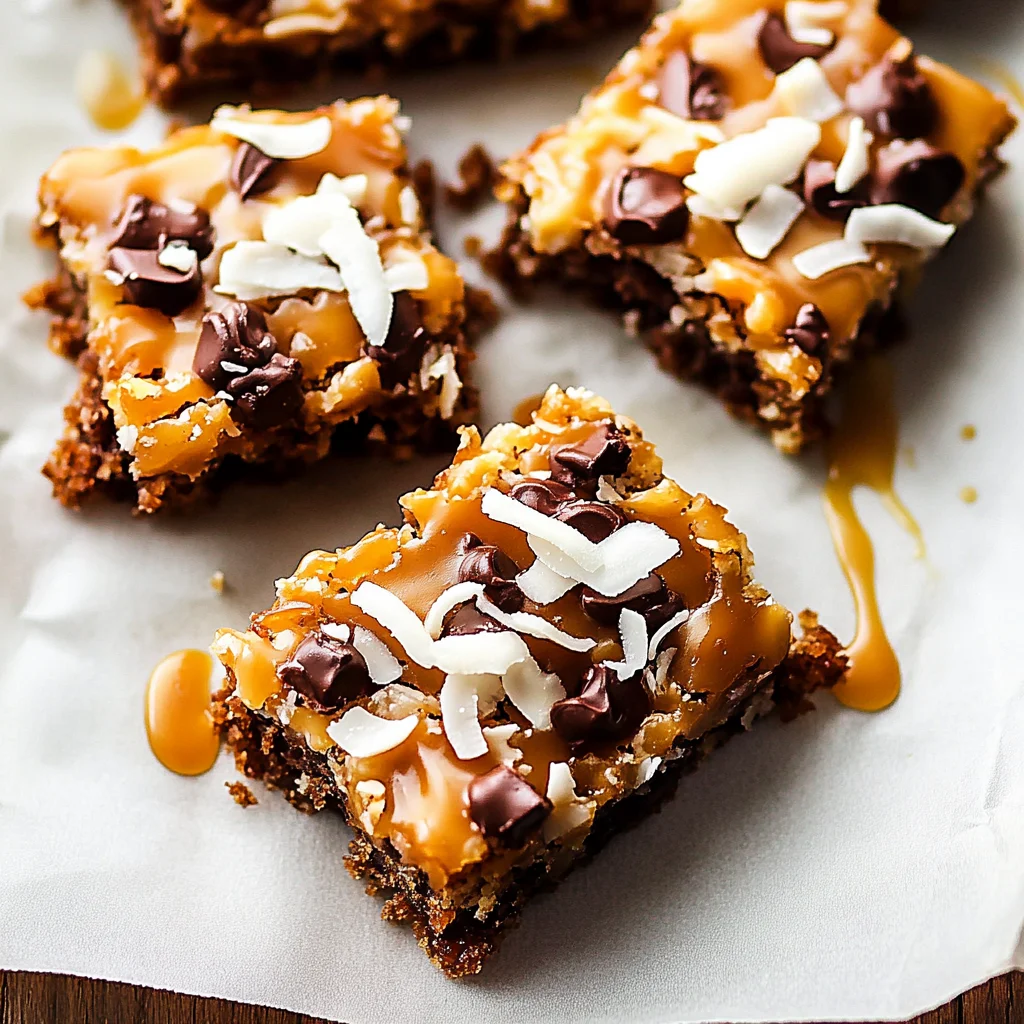
Imagine sinking your teeth into a Caramel Coconut Bar, where the luscious layers of rich, buttery caramel meld seamlessly with the satisfying crunch of toasted coconut. The sweet aroma envelops you, inviting you to indulge in a treat that feels both luxurious and comforting, perfect for brightening any day or celebrating special moments with loved ones.
What sets these bars apart is their delightful chewiness, achieved through a careful balance of ingredients that create a harmonious blend of flavors and textures. Each bite offers not just sweetness, but also a touch of nostalgia, reminiscent of warm family gatherings and shared laughter. Treat yourself to this delectable recipe and let the warmth of homemade goodness fill your heart.
Why You’ll Love This Caramel Coconut Bars
These Caramel Coconut Bars are an irresistible treat that masterfully balances chewy and creamy textures, creating a delightful mouthfeel with every bite. The rich base, made from melted butter and brown sugar, provides a buttery depth that perfectly complements the sweet, luscious caramel layer and the toasted coconut’s nutty aroma. As you sink your teeth into these bars, you’ll experience the satisfying contrast between the soft caramel and the chewy shredded coconut, making each piece a little piece of heaven. Trust me, once you taste these indulgent delights, you’ll find yourself craving them again and again—so why not whip up a batch tonight?
What Kind of Flour Should I Use?
For the Caramel Coconut Bars, all-purpose flour is your best choice. This type of flour strikes the perfect balance between protein content and versatility, providing just enough structure to hold the bars together while maintaining a chewy texture that complements the rich caramel and toasted coconut layers. If you prefer a gluten-free option, you can substitute all-purpose flour with a 1: 1 gluten-free baking blend; just keep an eye on the texture as you mix, since some blends may absorb moisture differently. Remember, using a different type of flour may affect the final consistency, so adjust your liquid ingredients as needed to achieve the right dough.
Gather These Ingredients
Each ingredient in this dish plays an essential role in flavor and texture. Here’s what you’ll need:
- 1 cup all-purpose flour: Forms the sturdy base for chewy bars.
- 1/2 cup brown sugar (packed): Contributes sweetness and a hint of molasses flavor.
- 1/2 cup unsalted butter (melted): Provides richness and helps bind the ingredients together.
- 1/4 teaspoon salt: Enhances the overall flavor by balancing the sweetness.
- 1 cup sweetened condensed milk: Creates a creamy, luscious caramel layer.
- 1/2 cup brown sugar (packed): Deepens the caramel flavor with its rich sweetness.
- 1/4 cup unsalted butter (cubed): Adds smoothness and helps achieve a silky caramel texture.
- 1 cup sweetened shredded coconut: Introduces a delightful chewiness and tropical flair.
How To Make the Caramel Coconut Bars

Preheat and Prepare the Pan
Preheat your oven to 350°F (175°C) and line an 8×8 inch baking pan with parchment paper. This step ensures that your caramel coconut bars will bake evenly and be easy to remove once they’re done.
Combine the Dry Ingredients
In a mixing bowl, combine 1 cup of all-purpose flour, 1/2 cup of packed brown sugar, melted butter, and 1/4 teaspoon of salt. Mix these ingredients together until the mixture becomes crumbly, ensuring everything is well incorporated for a consistent base.
Press the Mixture into the Pan
Take the crumbly mixture and press it evenly into the bottom of your prepared baking pan. Use your fingers or the back of a spoon to make sure it’s firmly packed; this will create a solid foundation for the caramel layer.
Bake the Base
Place the pan in your preheated oven and bake for 10 minutes. The edges should start to look slightly golden, which indicates that you’re on track for a perfect base. Once baked, remove it from the oven and let it cool slightly while you prepare the caramel layer.
Heat the Caramel Ingredients
In a medium saucepan over medium heat, combine 1 cup of sweetened condensed milk, 1/2 cup of packed brown sugar, and cubed butter. Stir continuously until the mixture comes to a gentle boil and thickens, which should take about 5-7 minutes; look for a smooth consistency that coats the back of a spoon.
Add Shredded Coconut
Once thickened, remove the saucepan from heat and stir in 1 cup of sweetened shredded coconut until well combined. The coconut should be evenly distributed throughout the caramel mixture, adding that delightful texture you’ll love in every bite.
Spread Caramel Over Base
Pour the caramel mixture over your cooled baked base and spread it evenly with a spatula. Make sure it reaches all corners of the pan so every piece has that luscious caramel goodness when cut.
Bake Until Golden
Return the pan to the oven and bake for an additional 15 minutes. Keep an eye on it; you want the top to turn golden brown, indicating it’s perfectly cooked.
Cool Completely
Remove from oven and allow it to cool completely in the pan on a wire rack. This cooling time is crucial as it helps set the bars properly before cutting them.
Cut into Squares
Once cooled, carefully lift the bars out using the parchment paper and place them on a cutting board. Use a sharp knife to cut them into squares; this will give you those beautifully defined pieces ready to enjoy!
How to Serve and Store Caramel Coconut Bars
These Caramel Coconut Bars yield 4 delicious servings, making them perfect for an indulgent treat to share with friends or family. For a delightful presentation, slice the bars into squares and serve them on a rustic wooden board, drizzled with extra caramel sauce. Pair them with a scoop of vanilla ice cream or a dollop of whipped cream to complement their chewy texture and rich flavor, creating a beautiful dessert experience that everyone will love.
To store any leftovers, simply place the bars in an airtight container and keep them in the refrigerator for up to one week. When you’re ready to enjoy them again, reheat the bars in the microwave for about 10-15 seconds; this will soften the caramel layer without compromising the bar’s structure. While these treats are best enjoyed fresh, they can be frozen for up to three months, though you may notice a slight change in texture upon thawing.
What to Serve With Caramel Coconut Bars
Creamy Mashed Potatoes
The smooth and buttery texture of creamy mashed potatoes provides a delightful contrast to the chewy caramel coconut bars.
Roasted Brussels Sprouts
Caramelized edges on roasted Brussels sprouts offer a savory bite that perfectly balances the sweetness of the bars.
Garlic Bread
The crunchy, garlicky goodness of garlic bread adds an irresistible contrast in texture while complementing the sweet flavors.
Fresh Spinach Salad
A fresh spinach salad with a tangy vinaigrette brings brightness and acidity that cuts through the richness of the caramel and coconut.
Cheesy Polenta
The creamy, cheesy polenta serves as a comforting base that harmonizes beautifully with the rich caramel notes of the bars.
Coconut Rice
Fluffy coconut rice enhances the tropical flavor profile and adds a lovely aromatic touch that resonates with the toasted coconut in the bars.
Can I use whole wheat flour instead of all-purpose flour?
Yes, you can substitute whole wheat flour for all-purpose flour in this recipe. However, keep in mind that the texture may be slightly denser, and you might want to adjust the amount of liquid slightly to achieve the desired consistency.
Are these Caramel Coconut Bars gluten-free?
No, this recipe is not gluten-free as it contains all-purpose flour. To make a gluten-free version, you can use a 1: 1 gluten-free flour blend in place of the all-purpose flour.
Can I make these bars ahead of time and freeze them?
Absolutely! These Caramel Coconut Bars freeze well. Once cooled and cut into squares, wrap them tightly in plastic wrap or aluminum foil and store them in an airtight container for up to three months.
How can I tell when the caramel layer is done cooking?
The caramel layer is ready when it reaches a gentle boil and thickens, which typically takes about 5-7 minutes of continuous stirring. You’ll notice a change in texture; it should be thick enough to coat the back of a spoon.
What can I add to enhance the flavor of these bars?
You can add chopped nuts like pecans or walnuts for added crunch or incorporate a teaspoon of vanilla extract into the caramel layer for extra depth. Experimenting with flavors will give your bars a unique twist!
Is it necessary to line the baking pan with parchment paper?
Yes, lining the baking pan with parchment paper is highly recommended. It makes it much easier to lift the bars out once they are cooled and prevents sticking, ensuring clean cuts for perfect squares.
Conclusion
There’s something truly special about Caramel Coconut Bars that makes them a must-try; the combination of chewy texture and rich caramel with toasted coconut creates a delightful treat that’s sure to impress. If you enjoyed these bars, you might also love our [Chocolate Chip Coconut Cookies] or [Coconut Cream Pie] for more coconut-infused goodness. We’d love for you to share your baking adventures with us on Pinterest, and don’t forget to let us know how your Caramel Coconut Bars turned out in the comments!
Caramel Coconut Bars
Ingredients
Method
- Preheat the oven to 350°F (175°C). Line an 8x8 inch baking pan with parchment paper.
- In a mixing bowl, combine flour, brown sugar, melted butter, and salt. Mix until crumbly.
- Press the mixture evenly into the bottom of the prepared baking pan.
- Bake in the preheated oven for 10 minutes, then remove and let cool slightly.
- In a medium saucepan over medium heat, combine sweetened condensed milk, brown sugar, and cubed butter.
- Stir continuously until the mixture comes to a gentle boil and thickens, about 5-7 minutes.
- Remove from heat and stir in the shredded coconut until well combined.
- Pour the caramel mixture over the baked base and spread evenly.
- Return the pan to the oven and bake for an additional 15 minutes, until the top is golden.
- Remove from the oven and let cool completely in the pan on a wire rack.
- Once cooled, lift the bars out using the parchment paper and cut into squares.
Leave a Comment